Try it yourself!
Interested in learning more about the PalCom Software Architecture? If you have read or heard about this new perspective on ambient computing the demo on this page is your chance for getting to know the main terms on a more concrete basis.
The PalCom toolbox is available for download, but if you're just interested in a quick glance we suggest you download and unpack the pre-compiled demo application on your computer. (Java 1.6 is required)
The Overview Browser
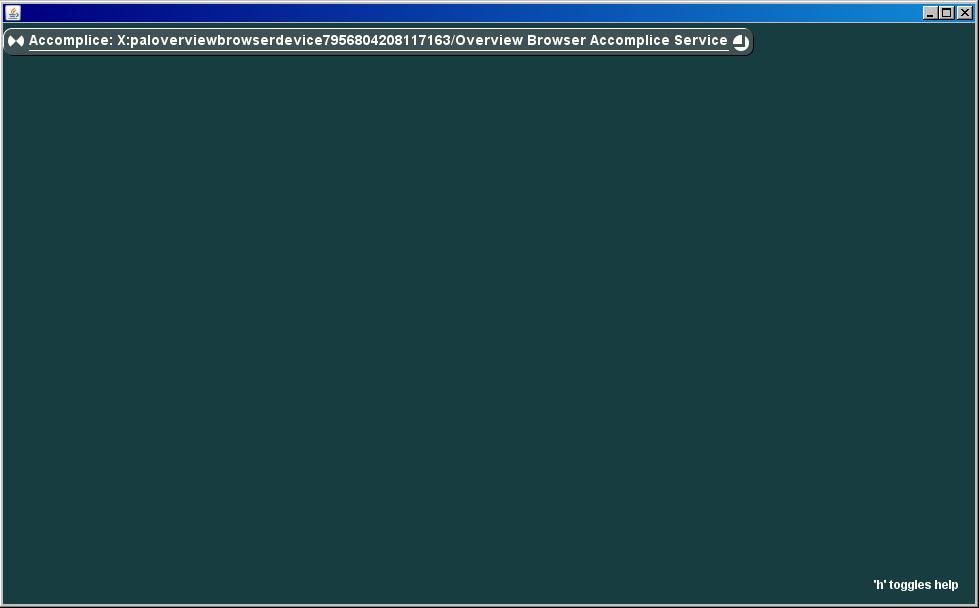
The first part of the demo is the PalCom Overview Browser that allows you to inspect any PalCom system on your network. The browser can be started with the batch file, "OverviewBrowser.bat" (Windows), "OverviewBrowser.sh" (shell/linux) or "OverviewBrowser.command" (Mac). Starting the overview browser (OVB) should result in a green window that is empty except for a single grey "Accomplice" block. This block is your "window" into the PalCom world, in that all PalCom devices and PalCom services running on the network will be discovered and shown in the accomplice. (If other people are playing around with PalCom Stuff on the same LAN as yourself, you will also be able to see their services and devices in your browser.)
You can expand the view on the OVB by clicking on the ![]() icon or by dragging the
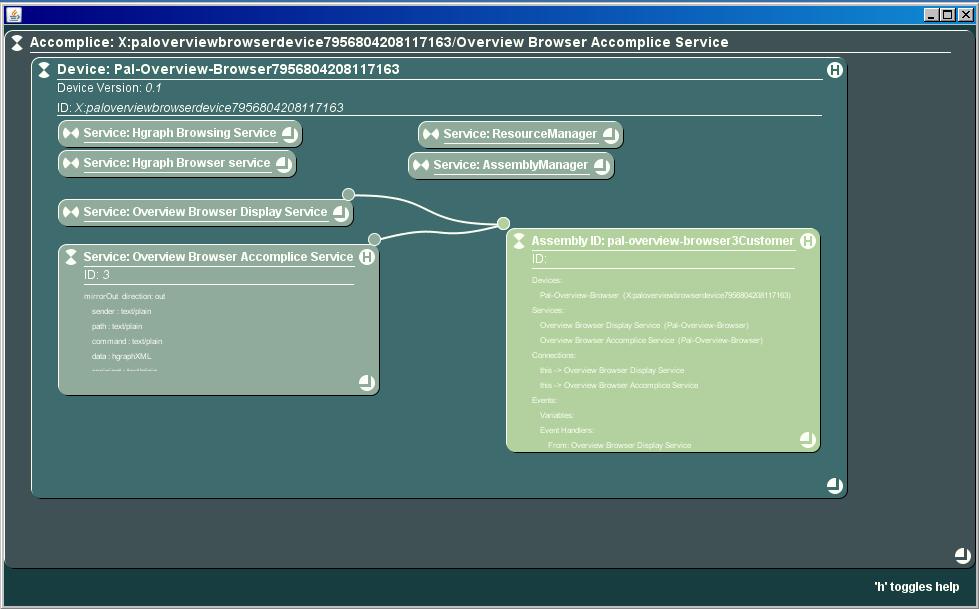
icon or by dragging the ![]() icon in the corner of the the accomplice, and all devices and services. Doing so will reveal that the OVB is hosting a range of Services and one assembly, as shown hereunder:
icon in the corner of the the accomplice, and all devices and services. Doing so will reveal that the OVB is hosting a range of Services and one assembly, as shown hereunder:
The OVB reveals that the browser is itself made as a PalCom Assembly running on your machine. A PalCom Assembly is the entity that binds services and devices together in order to expose a combined functionality to the user. A running assembly is represented in the browser with a light green color, as if it was a kind of service. The assembly connects the DisplayService with the AccompliceService and is administrated by the Assembly Manager and Ressource Manager on the Device (This dependency is not shown in the browser, the browser concentrates on how the assemblies tie services and devices together.)
The PalCom Application Launcher
Now let's try to launch another PalCom assembly on the network (or from the same computer). You can keep the Overview Browser running while doing this in order to see the new devices/services/assemblies appear on the network (you may want to minimise the OVB by pressing ![]() to allow space for the new assembly). The easiest way to launch new PalCom Services (from a computer or other JSwing-enabled device) is using the "Launcher" application that you can start with the script in the demo folder ("Launcher.bat" on Windows; "Launcher.sh" in shell (linux); "Launcher.command" on Mac).
to allow space for the new assembly). The easiest way to launch new PalCom Services (from a computer or other JSwing-enabled device) is using the "Launcher" application that you can start with the script in the demo folder ("Launcher.bat" on Windows; "Launcher.sh" in shell (linux); "Launcher.command" on Mac).
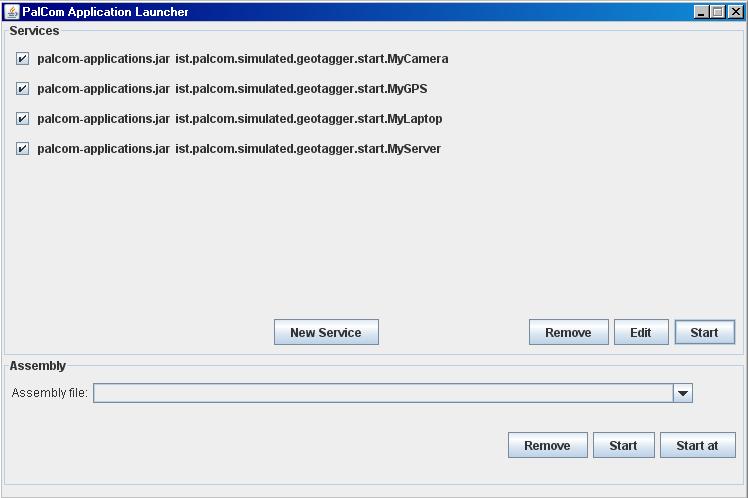
Running the Launcher application will provide you with the following GUI:
(The Launcher is itself another device. A few WindowsXP machines seem to have problems running multiple devices, if you get a "java.net.BindException", you can get more info and a workaround-fix here).
New services are selected for launch by first browsing the file system for the appropriate .jar file, and secondly by selecting which services to launch from that jar file (i.e. selecting the Main class). The lower part of the launcher application is for executing assembly scripts (.ass files) that will bind the devices and services together in assemblies as specified in the script. The order of these two steps is not important. A service will live independently on being assembled into an assembly, and an assembly can be launched even though the required services are not present. In the latter case the assembly manager will wait for the missing services or devices to appear on the network and constitute the assembly when possible.
Assemblies can be "hosted" on any device that runs an AssemblyManager service. If you select an assembly script in the launcher and press "Start At", the launcher will make a discovery call for assembly managers and you can then select the one to host the assembly. With the "Start" button you can also create a new assembly manager to host the assembly on a new device created for that purpose alone. (The name of this new device, "CommandLineAssembler" is due to the fact that the launcher is just a simple GUI for a command line assembly tool.)
The GeoTagger example
We will use an example called "GeoTagger" to illustrate how assemblies work. In many situations a picture will be more valuable if it holds information of where it was taken. This is called "geotagging" and could turn out to be a standard feature in next generation digital cameras. In the meantime, if you are carrying both a GPS device and a camera, you will have to do this manually, but the GeoTagger assembly example shows how it can also be done automatically by assembling the GPS and the camera into a combined system. The GeoTagger is a simple assembly consisting of a camera, a GPS device and a storage server. These devices can be connected by an assembly that has also connection to a service capable of annotating a picture with a GPS coordinate. Once the assembly has connected these devices and services a picture taken by the camera will be annotated with the current GPS position and stored on the server.
The assembly has been compiled in a version consisting of Simulated Devices instead of physical devices. A Simulated Device means that the PalCom services are the same services that would have run on the actual hardware of the real assembly, but in this version we have exchanged the hardware with a software application/GUI simulating the hardware device. In this simulated world the tagging-service is hosted on a laptop, that also runs an assembly manager.
In the demo folder you can find the jar file and the assembly script for the geotagger example. From the launcher, press "new service", browse to the "palcom-applications.jar" file and from this select the following (one at a time):
- "ist.palcom.simulated.geotagger.start.MyCamera"
- "ist.palcom.simulated.geotagger.start.MyGPS"
- "ist.palcom.simulated.geotagger.start.MyLaptop"
- "ist.palcom.simulated.geotagger.start.MyServer"
Notice that the launcher application saves your choices in a text file, "bookmarks", for easy selection next time. Selecting and starting these services creates the simulated device GUIs, that should look as in this screenshot:
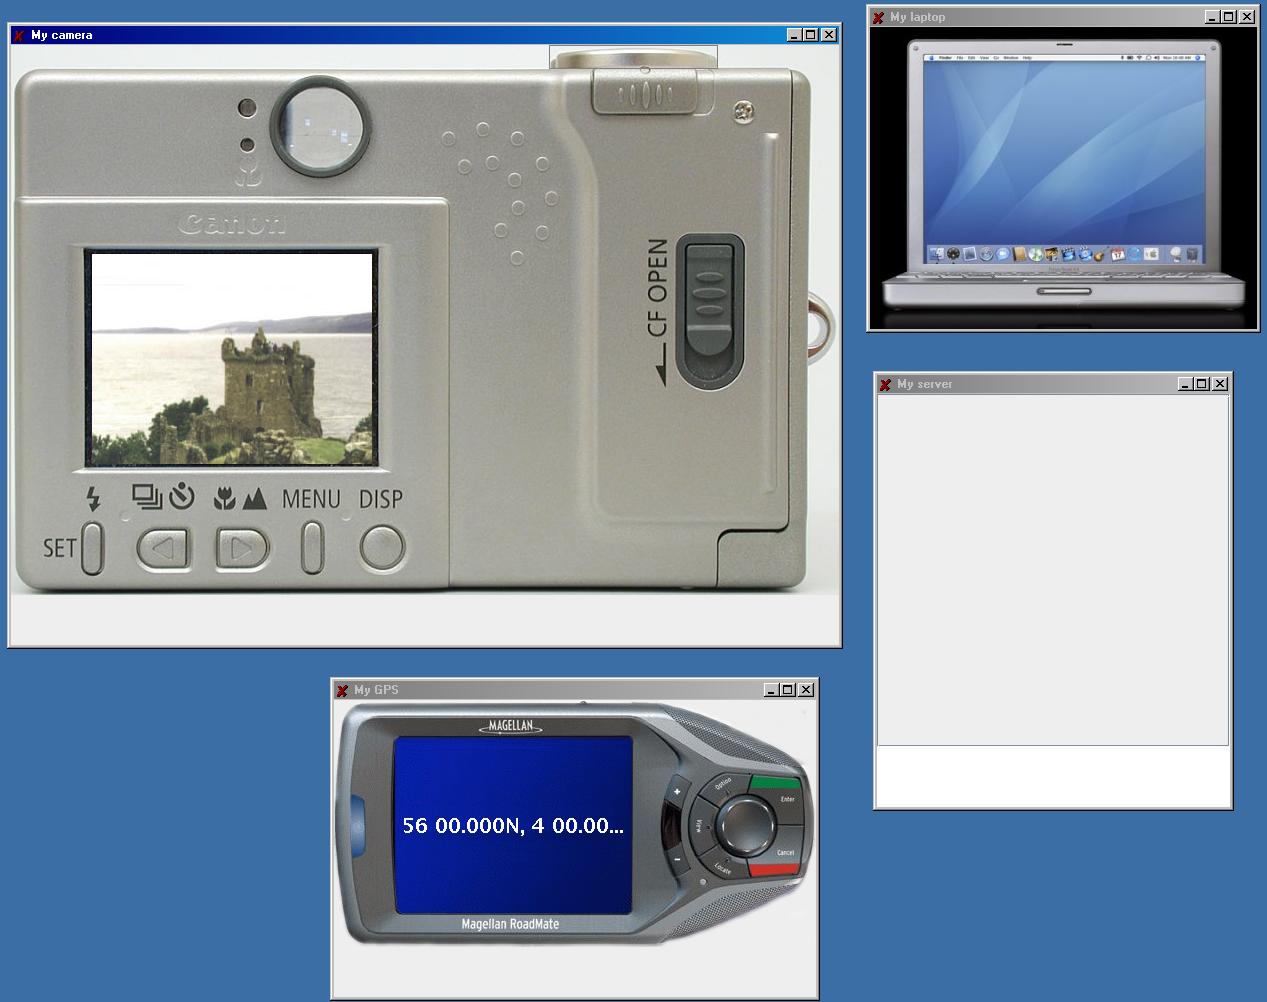
Though difficult to see, the GUIs for the camera and the GPS are not fully static. You can press the camera button on the top of the camera to "take picture" (the camera simulator can only photograph the same castle, however), and holding down the mouse button while dragging across the gray area below the camera and the GPS unit, you can change the picture in the camera and the GPS position in the GPS simulator.
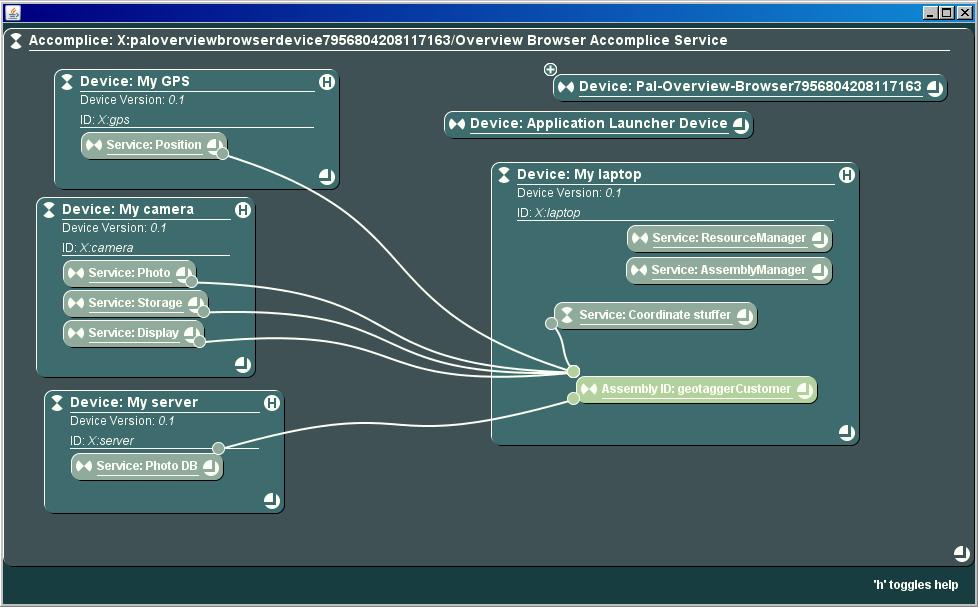
Having launched the geotagger devices you should be able to see them appear in the OVB (it may take a few moments for them to be discovered). Notice that there's no connections between the camera, the GPS and the picture server before you load the assembly file with the launcher: Select the "GeoTagger.ass" file in the demo files and press "Start At", selecting the assembly manager on the Laptop. By executing the assembly script from the application launcher, you make the assembly manager establish the assembly combining the devices. You can now see the connections in the OVB and you can test how a picture taken by the camera is sent to the server after being tagged with the current GPS position.
Inspecting running assemblies
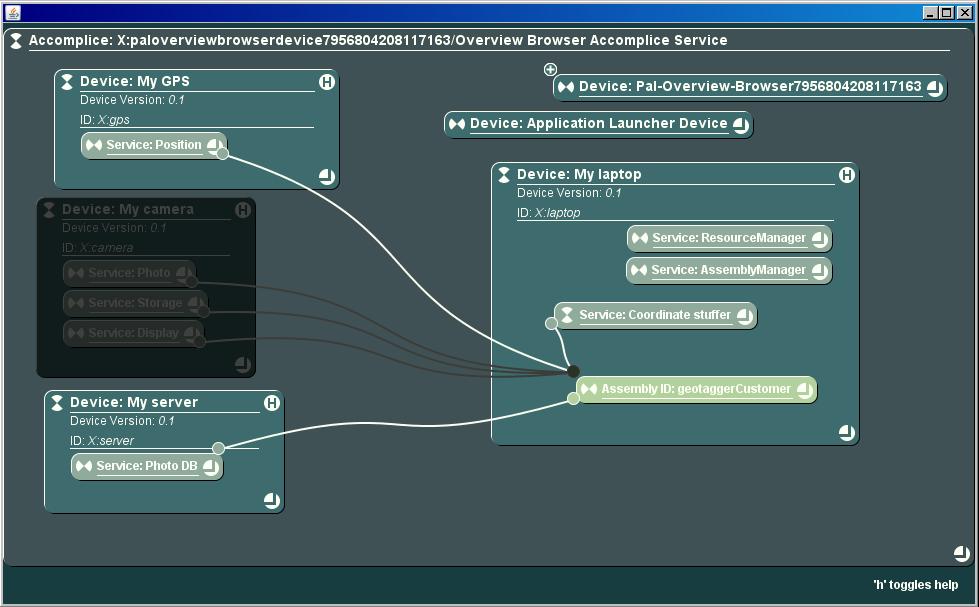
With everything running, the overview browser should look like this:
You can try to shut down one of the devices (Close the GUI), e.g. the camera, to see that the assembly is kept alive even though the device is "blackened out" in the browser.
Starting the device again (using the launcher application) it will resume its position in the assembly. (Currently the assembly manager waits forever for the device to reappear.)
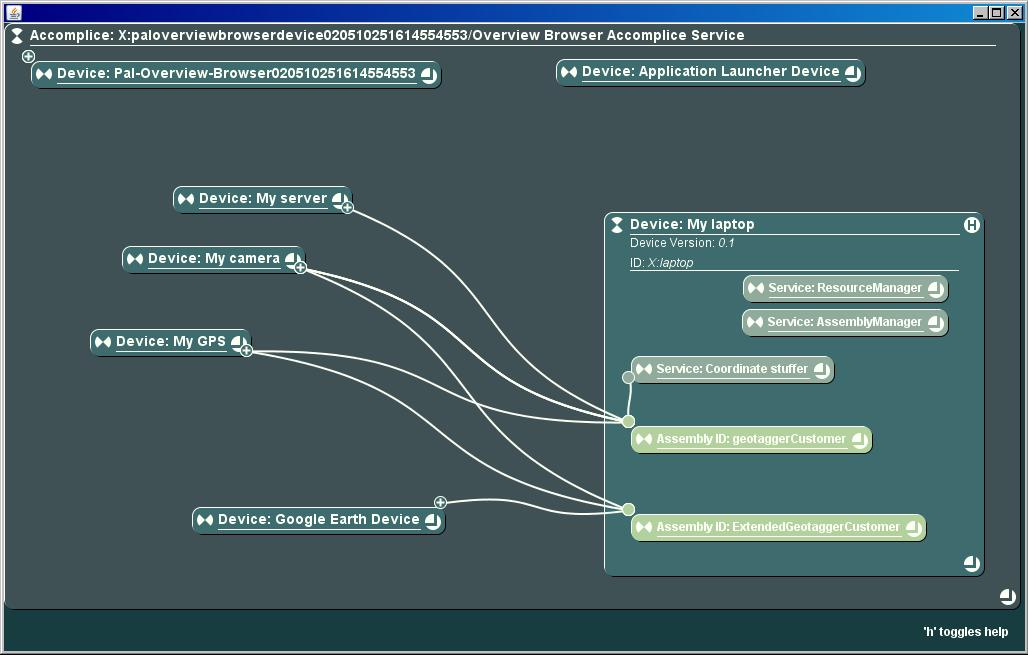
One of the advantages of structuring the total system as assemblies of services is that the single service can be shared and partake in multiple assemblies. This makes it easy to make extensions to running assemblies without affecting the behavior of the original assembly. We will illustrate this point by incorporating a new service into a new assembly while keeping the original assembly running.
From the launcher you can start a “Google Earth Service” by starting “ist.palcom.services.googleearth.GoogleEarthDevice” from the “palcom-applications.jar” file. This is a simple service that can write geotagged images (i.e. images as the ones produced by the geotagger assembly) to a KLM-file, which is a description of data that can be read by Google Earth and placed as meta-data on the map on the respective position. (The next part of the demo requires you to have Google Earth installed on your computer)
Editing assemblies with the Developer's Browser
To assemble this new service into the running assembly we are going to introduce a new tool. As the name suggests, the OverviewBrowser is primarily seen as a tool for providing an overview of the running entities – for instance you can see the Google Earth service running despite it has no GUI in itself. To change/edit a running assembly we will use the PalCom Developer’s Browser that can be downloaded here in a precompiled version for Windows, Linux and Mac.
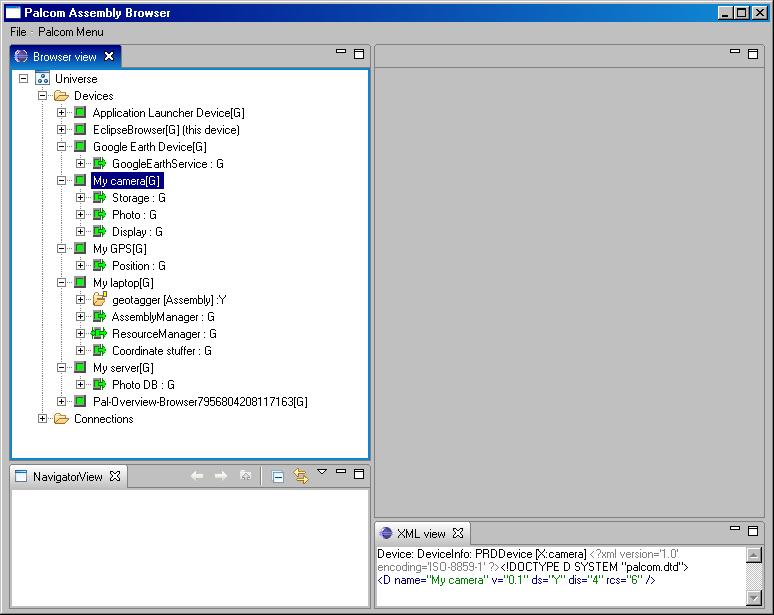
Unzip and start the developer's browser, and you will see the three panes open: "Browser view", "NavigatorView", and "XML view", as shown in this screen shot:
In the "Browser view" you should see the top branch ("Universe") of the tree of discovered services and devices (i.e. the same devices as you see in the OverviewBrowser). First step is to create an empty assembly description and drag the geotagger devices onto the description:
Right-click on the "Navigator view" and select New Project. Select the "new project" wizard and click "next". Name your project and press "Finish".
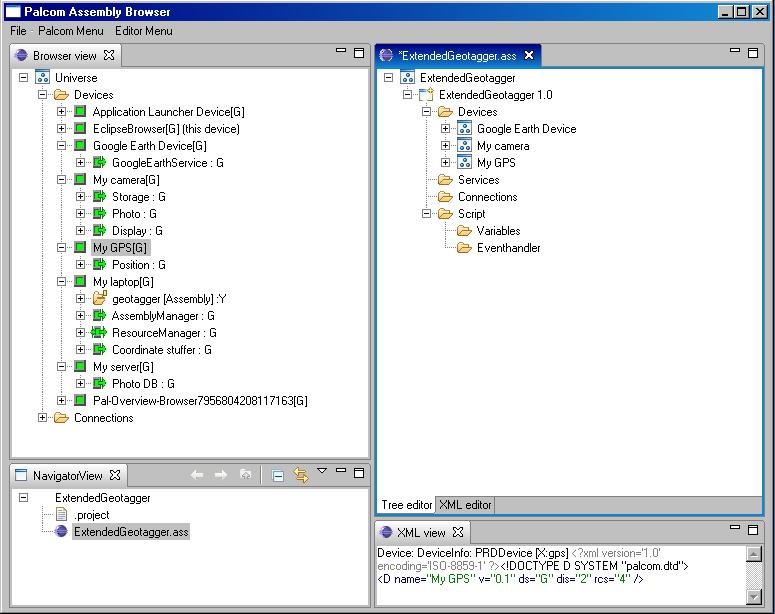
Right-click once again on the "Navigator view" to create a new file: Select "New->other" and select the "new file" wizard. Select your project as the container of the new file and name the assembly file. The PalCom convention is to finish the name with the ".ass" extension, e.g. "ExtendedGeotagger.ass".
The geotagger devices should appear in the "Browser View" pane if they are running on your computer (or another computer on the same LAN). You can now drag the devices one-by-one to the assembly editor pane dropping them in the "Devices" folder in the assembly description tree to make them part of that assembly. For the Google Earth extension of the geotagger we need to involve the Camera, the GPS and the Google Earth Device. Doing so should give you a browser looking like this:
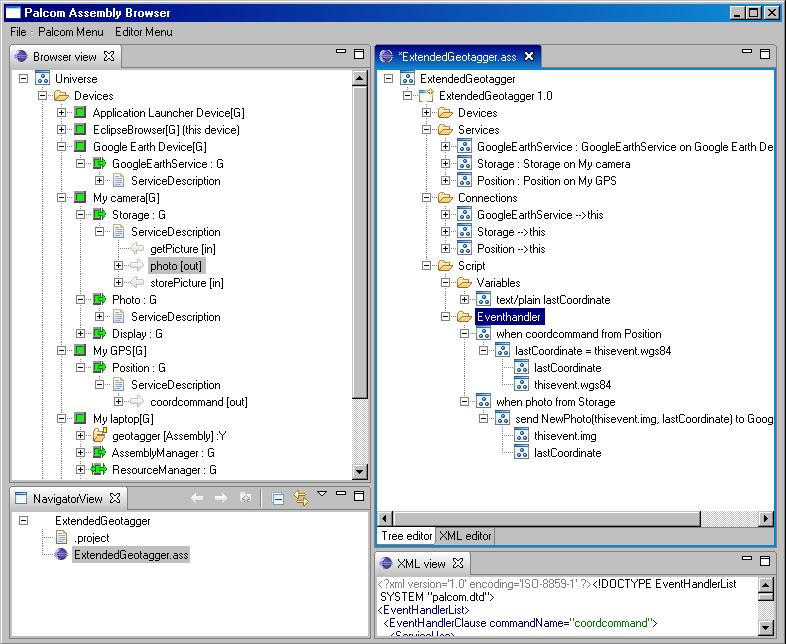
Next, the services in need of connections to the assembly must be dragged from the browser view pane to the assembly editor pane: Drag the GoogleEarthService from the Google Earth Device in the Browser view to the "Services"-folder in the assembly editor. Likewise with the Storage service on the Camera and the Position service on the GPS. Next, these services must be dragged once again, this time to the "Connections"-folder in the assembly editor.
To communicate the GPS position between the GPS device and the Google Earth service we need an internal variable in the assembly, which is made by right-clicking and selecting "Add Variable" in the "Variables" folder located under "Scripting" in the assembly editor tree. Make a variable of type text/plain and call it something like "latestCoordinate".
Finally, we need to establish the communication policies in the assembly which is done by specifying event handling:
- Drag the "coordcommand" from My GPS -> Position -> PRDServiceFMDescription on the browser view to the "eventhandler" folder in the assembly editor. This should cause a new event, "when coordcommand from Position"
- Right-click on the new event and select "Add assignment". Select your coordinate variable and assign to it the position value in wgs84 format.
- Drag the "photo" command from My camera -> Storage -> PRDServiceFMDescription to the eventhandler folder
- Right-click on the new "when photo from this" event and select "Add Send message". Select the Google Earth service as the recipient of the message and select the "NewPhoto" command under the service description as the target. Choose the jpeg variable for the first parameter (Photo) and your "latestCoordinate" for the second parameter (Coordinate).
Carrying out all these steps you should end up with something like this:
To start an assembly an assembly manager is needed. By selecting "Start assembly" from the PalCom Menu the Developer Browser's own assembly manager will be used. The Browser will ask if you want to release / put a version on your assembly (and thus lock it for further editing), but if you prefer you can also continue experimenting with the assembly in runtime, i.e. an assembly does not have to be released to be launched.
If you want the assembly to be hosted by another assembly manager instead, you can load the assembly onto this by:
- Right-click on the chosen Assembly Manager in the browser view, e.g. the one on the Laptop device. Select "Control".
- Right-click once more and select "Open UI"
- Select the "XML editor" pane in the assembly editor view and mark and copy the complete "<PRDAssembly>" description - i.e. everything but the first two and the last line in the editor.
- Put the cursor in the AssemblyInfo box of the "load" command in the UI and paste in the desccription. Press "Load".
- You can also simply paste the XML description into a text file with extension ".ass" and load it via the launcher application.
Testing and experimenting with the assembly
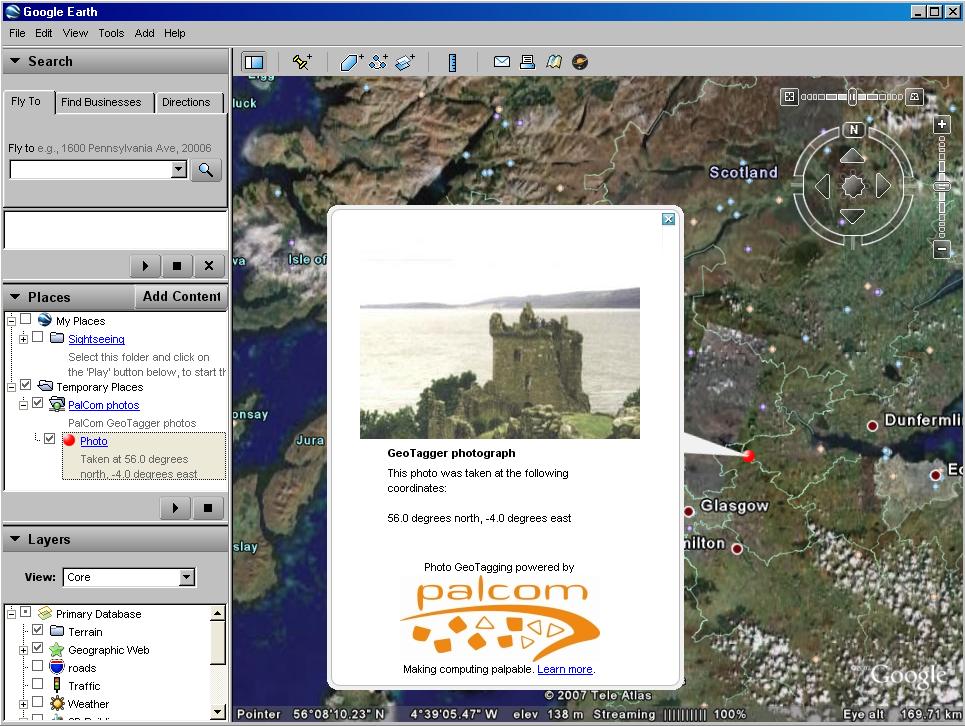
When the new extended assembly is up and running, we can go on and take a picture with the camera. The Google Earth service saves the images and KML files in the “res” directory. From within Google Earth, open the "palcom-netlink.kml" (i.e. select “Open” in the File menu and browse to the “res” directory in the folder where you unzipped the demo). In the list of places on the left hand side of Google Earth a new category, “PalCom Photos” will appear, and you can click on the red dot to be taken to the location of the image (in Scotland, if you did not change the GPS position):
Likewise, subsequent photos will appear on the map, albeit you may need to force Google Earth to reload the images e.g. by moving the camera point a bit. The OVB browser will show that both assemblies are running simulatenously while sharing some of the services and without the new assembly affecting the original in any way:
What we hope to have illustrated by this very brief demo example is how the main concepts of the PalCom architecture - the assembly, device and service - allow for structuring a distributed system in a way that allows for overview and inspection of the running entities as well as the combined system. But of course, there is much more to it than that! If you are interested in learning more, we suggest that you install the PalCom open source toolbox for further experimentation or follow one of the tutorials for programming for palpability enclosed in the toolbox.
Thank you for your interest in PalCom!

